![]() We’ve got a great (and fast!) fabric covered gift box pattern. This pattern takes about 2 hours to assemble, assuming you have the materials you need and are pacing yourself. It’s possible to go faster or slower.
We’ve got a great (and fast!) fabric covered gift box pattern. This pattern takes about 2 hours to assemble, assuming you have the materials you need and are pacing yourself. It’s possible to go faster or slower.
What’s the best thing about it? There’s very little sewing involved! If you can do a basic whip-stitch and know how to cut fabric and use an iron, you can do this! This is a great gift idea and you can use up those old fabric scraps, trims and beads. Plus, you can customize the box to any occasion! You can still sew the edges together instead of using Fusible Web, however, and also sew embellishments on it. This is a great gift idea for birthdays and holidays. The gift can be the box itself, or it can house another gift.
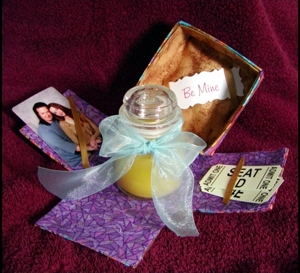
This box pattern is square in shape with a lid. You can also find instructions below to make your own custom size. When you open the box up, the sides will fold down. You can use this to showcase photos, or to house a gift for someone, store sewing supplies, keep memorabilia items together – the possibilities are endless!
To make the box, you’ll need the following items:
- A roll of Stitch Witchery (fusible web) – this can be omitted if you plan to sew the fabric on instead of fusing it on.
- Fabric remnants – it’s best to use lightweight cotton or cotton blends, because you are going to be using a hot iron to secure the fusible web. If you plan to sew the fabric on instead of fusing it on, you can use other fabrics that are more heat sensitive.
- Scissors
- Light weight cardboard. I used a cardboard photo mailer.in the example images.
- Fabric glue
- Ribbon
- Tape (to hold the pattern pieces together.)
- Masking tape
- Pattern (Downloadable PDF available here!)
Notes: Iron your fabric flat before you begin. You CAN substitute paper for the fabric. You can still use fusible web (test it first though!) or glue, or even tape.
It’s Time to Assemble The Fabric Box!
 Scroll down for instructions to make your own custom box size. You can also make this project larger than the provided pattern. Make it taller by taping extra paper to the ends of each box flap. If you want the base larger, enlarge the pattern on a copy machine first. Just be sure to use a heavier cardboard if you make it much bigger, so it can hold up to the weight of being a larger box.
First cut the pattern out of the paper and tape pieces A and B together along the long edge. (Refer to the pattern pieces for more about this.) Cut the cardboard pattern pieces out of your cardboard. As previously mentioned, I used a photo mailer. Hold your ruler up to the corners of each side, and run the rounded edge of a butter knife (or similar object) along the ruler, to “score” the cardboard so the sides will fold up easier.
Pin the pattern pieces with the seam allowance to your fabric and cut the fabric out. You’ll need to cut two of each piece. These can be cut in contrasting fabrics, if you wish, so that the inside will be a different color or pattern from the outside.
Now heat up your iron. We want to iron the seam allowances before ironing the fabric to the cardboard. This is because it will be easier later to fuse it if the seam allowances are already established. If you do them both at the same time, you might pucker the fabric and won’t get very straight results. The seam allowances provided in the pattern are 3/8″. You can use pins or paper clips to hold the fabric to the cardboard if you need to. The holes won’t be visible when you’re finished.
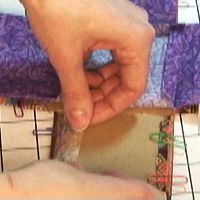 Once your seam allowances are defined, line the fabric up to the cardboard, making sure the outer fabric wraps around the cardboard edges to the inside, and the inner fabric remains to the inside and only covers the inside. Cut a piece of fusible web for each of the three sides of the first flap. Using pins to hold them in place, you’ll put the fusible web over the outer fabric seam allowance and under the inside fabric edge.
Follow the instructions on the fusible web package to make sure that your iron is set to the correct temperature and that it is sealed to the fabric properly. I used Stitch Witchery which requires the use of a damp press cloth.
Before fusing anything to the lid, tape the sides together with masking tape on the outside of the lid. This is to keep the fusible web from sticking straight to the tape, as you’ll be fusing the lid fabric on the inside of the lid. You’ll follow the above instructions to cover the lid with fabric as well, making sure to fuse on the inside flaps of the lid.
How to Embellish Your Gift Box
You can be creative with this part. Feel free to deviate from the instructions here!
Cut a 3″ piece of ribbon. Glue it to an inside flap by putting a glue dot on each end, leaving the center free. Allow the glue to dry. You can slip a wallet size photo, tickets, or a note in here now. Iron-on patches can be adhered to the outside or the inside of the box once the fabric is attached. You can also glue or sew beads or findings to the outside or inside of the box to personalize it. Not good at beadwork? That’s okay! You can buy pre-beaded trims and motifs at your local fabric or craft store. They’ll easily attach with fabric glue, which dries clear.
Fold up the sides of the box and put the lid on. It will hold the box closed until you give it to someone special!


Click below to view the Video Tutorial!
How to Make A Custom Sized Gift Box Pattern
If you want to make your own pattern, please read below:
Lucy writes: I would like to make a fabric box like the one in your video, but I need a different size. Is there a formula for making the box sizes?
There is are a couple of ways you can go about doing this. One is if the box you need is similar in size to the pattern we provide, simply print out and alter our pattern using the instructions above. Another is to use the following tips and image to help you figure out the size you need.
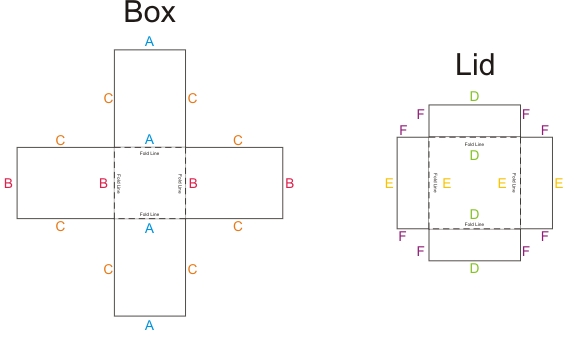
For the box shape:
- A = length of box
B= width of box
C = height of box
For the box lid:
- D = width of lid (A + 1/8″ or 1/4″)
Note: this tutorial shows A + 1/8″ because the cardboard I used is thin, like the kind you’d see on a box of tissues. But if you are using thicker cardboard such as corrugated cardboard, add 1/4″ to give extra room to fit over the box.
E = width of lid (B + 1/8″ or 1/4″, see note above)
F = height of lid
Now draw your pattern out on a piece of paper and cut it out of cardboard. For the fabric, add 3/8″ allowance on all edges so you have enough to fold over the cardboard. Then follow the assembly instructions.