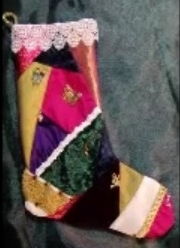
 This is a great project if you want to make something one-of-a-kind! It’s a great gift idea as well. The principles behind assembling the crazy quilt fabric can be used to make anything with this fabric. In this case, we’re going to make a Christmas stocking, but you can easily continue adding onto it to make something larger like a bed quilt, tote, pillows, clothing, anything!
Materials
First, you will need an assortment of fabric remnants. Because I sew a lot, I already had some laying around. However, if you do not have any scraps available, you can purchase remnants at your local fabric store. Many times you can even find complimentary pieces bundled together, such as coordinated “fat quarters” used for quilting. The sky’s the limit on what kind of fabrics you can use for this project.
In my example, I used a combination of silks, polyester satins, velvet, and crushed velvet. I lined the stocking with polyester satin. You do not have to line yours, but if you do, you can use any fabrics – just remember it won’t really be visible and there’s a risk that it could snag if you put something pointy in the stocking! For that reason, I recommend cotton (first choice), a thick satin, or any medium weight fabric will do. Try to stay away from sheer or delicate pieces. Also, think about what you might want to embellish the stocking with. I used various pieces of lace edging, cording and then added metal charms and glass beads.
The Pattern
We’ve got some free stocking patterns if you want to do this project and need some help getting started, but you can also draw your own or trace your favorite stocking to use as a pattern. Just remember to add in enough for the seam allowance and to make sure the opening is big enough to get into!
Check out the video tutorial for this project!
Directions
After you pick out the fabrics you’re going to want to use, choose one of them as your started piece. Depending on how you place it, it may or may not end up in the center of your quilted fabric. The choice is yours.
1) Cut the fabric into a five sided piece. Remember to cut it a little larger than its finished size to allow for the seam allowance. The sides do not have to be equal in length. This is just to get you started.
2) Next cut the second piece. Try to keep a good contrast. Pin the second piece to the first and sew along that edge using a 3/8″ seam allowance. Using a pair of scissors and the grid on your cutting board or a rotary cutter and ruler, straighten out the edges so the two pieces form a straight edge.
3) Now cut a third piece and pin and sew as you did on the previous piece. Straighten the edges out again. You can iron your edges flat as you go, but if you’re sewing velvet or other delicate fabrics that cannot be ironed, it’s best to just finger-press them and leave the iron out of it. You can also top stitch over your seams if you want that look to it.
4) Continue this process with more fabrics. You might want to re-shape pieces once they’re sewn on to give more varied edges to work with.
5) Check your quilted fabric against the pattern piece as you go to make sure you’ll have enough coverage for the entire pattern.
Once you have enough quilted fabric for the front, it’s time to work on the back. You can either quilt the back also or use a solid fabric. I chose to use a solid fabric because the piece I made will not be seen from the back, so I just used a solid velvet for that side. Do what feels right for you.
 Remember to reverse the pattern piece before you cut out the other side so you don’t have two fronts!
6) Sew the front to the back with the right sides together.
7) Clip the curves and flip it right side out.
8) Embellish your stocking with cording, lace, beads buttons, charms – anything you want. If you sew something along the top, leave 3/8″ for the seam allowance. You’ll turn that top edge under when you finish it off.
9) Once you’ve finished attaching your embellishments, sew a loop to the edge to hang the stocking by. Choose something that will be able to handle the weight of a full stocking, and be sure to secure it to the stocking well. I like to add the loop before putting the lining in so that the raw edge of the loop is hidden between the lining and the outer stocking.
10) You can now add an optional lining. Just as you did for the main stocking, sew the right sides together, and clip the curves. The lining should be sewn right sides together but don’t flip it right side out. The right side needs to stay in the inside so that the raw edges are between the inner and outer stocking.
11) Slip the lining into the stocking and fold in 3/8″ of the top edge of both the lining and the stocking.
12) Sew the tops together by hand using a slip stitch or by machine. I prefer to do it by hand only because I add lace to the tops of my stockings and like to hide my stitches.
That’s it! Hang your stocking up and enjoy!