 First of all, I’d like to mention that this was an impromptu project. The cover for the bench had already been sewn, and I just happened to have a camera with me to catch how it was attached to the original. I do know how it was made though, so I will outline everything here.
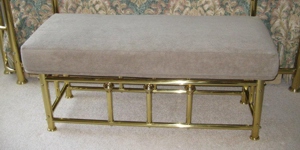
This was an existing bench at my mother’s house, and she’s had it for a very long time. It was in need of being recovered, so she used the original cover as a template and made a new one. Though it was already completed before I arrived, I’ll share how to do this below, but also how to make your cover from scratch, in case you don’t have one to use as a template.
Items You’ll Need:
- Upholstery fabric
- Backing fabric
- Foam Block – I recommend high density foam
- Batting – Recommend an upholstery quality batting such as “Nu Foam”
- Bench to be upholstered
- Scissors
- Staple gun – I recommend a powered one over the basic kind, just so your hands don’t get too fatigued.
- Staple Puller – just in case you need to remove a few and start over
- Large surface to work on
- Pattern paper and pen/pencil – I buy rolls of tracing paper from art/drafting supply stores. The slight transparency helps in case I need to trace something. You can also use old paper bags, packing paper, newspaper…
- Sewing machine, thread (This is optional. Some benches can be upholstered without sewing at all though.)
Make A Pattern From The Original Bench Cover
This assumes you are using either the original foam and/or batting from the bench or plan to replace it with same size cuts of replacement foam and batting. Otherwise your cover may not fit very well.
The easiest way to recover a piece of furniture is to just copy what was on it before. Carefully remove the old cover. I say “carefully,” because I’ve had to take apart things before with dry-rotted fabric and it just crumbled to pieces. If your furniture is old, proceed slowly and cautiously to preserve the original fabric until you’re able to make your pattern from it. Once the cover is removed, if there is more than one piece to it, take it apart at the seams with a seam ripper. Label each piece as to what it was and where it belongs on the overall design; for example, “Bench Cover, Lengthwise Side Panel”, or something descriptive like that. It’s a good habit to have in case something happens and you have to leave your project unfinished for a few weeks. Trace every piece to a sheet of paper.
A lot of times, there is very little seam allowance – but if you’re going to be sewing a new cover, be sure to add seam allowances back in. You choose how much to add (I usually add a half inch), but make sure it’s consistent between all your pieces. Leaving a lot of extra (a couple of inches) on any edges that are to be stapled down, to give you some extra room for adjustments. You can always trim it later after it’s been stapled down.
Or Make A New, Original Pattern For Your Bench
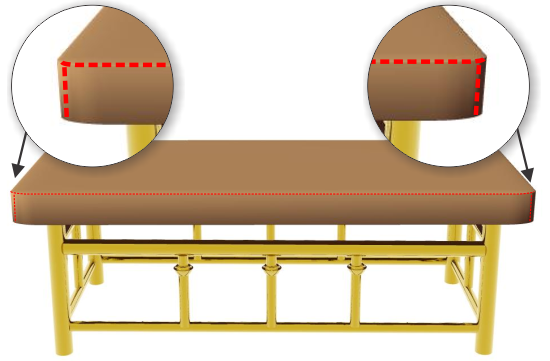
Another option is to make a pattern on your own. If you’re building a new seat or bought new foam that is sized differently from the old one, it’s often best to just start from scratch. Measure the foam and draw your fabric pattern out onto a sheet of paper first. This particular bench cover has a top surface, piping, and sides. So to fit the foam pictured here, you’d have to measure the top (that would be one piece). Then measure the dimensions of the sides. You can add up the length and make one long strip to go all the way around, or measure each side and cut a piece, leaving a vertical seam at each corner (this is what she did with this particular bench cover.)
Here’s some examples of options for the sides of the cushion:
You can use four pieces, sewn together, which will make a seam at each corner. Cut the length along the grain of the fabric, which is parallel to the selvage. Here is an example showing a bench using four pieces on the sides, with the seams on the corners:
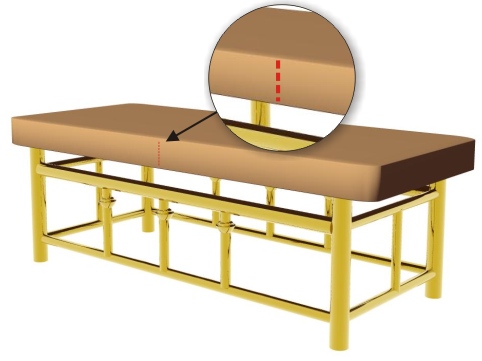
Or perhaps your fabric has a repeating pattern on it, and you don’t want to break it up into pieces. you can measure the entire outer edge, and only have one seam which can be hidden in the back, like this:
Finally, there is piping around the bottom edge. She purchased a length of cotton piping (usually found in the Home Dec trim department at your local fabric store) and covered it with fabric. To do this, simply cut a wide piece of fabric, fold it over the piping, and staple into place.
Remember to add seam allowances to all of your pattern pieces! Add extra allowance on all edges that are to be stapled down. It’s better to have a little extra and trim it later than to not have enough.
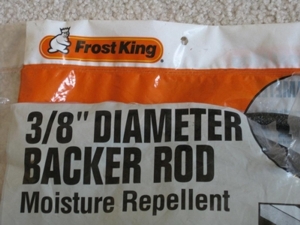
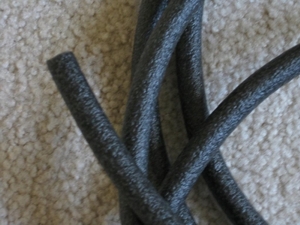
 The piping used on this bench was 3/8″ and covered with fabric. Whoever made the original cover didn’t used traditional upholstery piping and we wanted to pass this along to you, in case you don’t have access to a store that sells upholstery piping. You can also use this insulating foam cording, which can be found at the hardware store. Here’s a photo of the cording that was used on the bench pictured here. In hindsight, my mom said she probably would have used upholstery piping instead, but in a pinch, this stuff works great and really holds its shape.
Replacing The Foam And/Or Batting
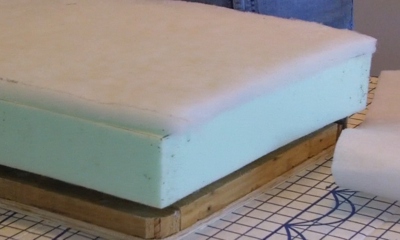
Many times, over years of use, foam and batting begin to break down. When this happens, it’s a good idea to replace the materials while you’re in the process of recovering it anyway. Obviously you will use the original foam and batting as a template for the new pieces. Try to cut them as close to the originals as possible. The bench in our example here has various layers of foam and batting.
There’s batting underneath the foam, but that is to fill in some gaps that the original manufacturer left in the base so the foam block doesn’t sag in those areas. You may not need to add a layer of batting underneath your project.
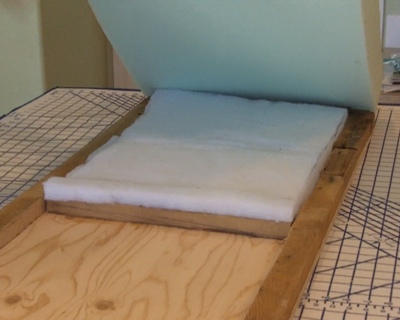
Here’s the layers from the top view. Another layer of thin batting will cover everything in this image to give it a smoother appearance:
If you don’t have a foam cutter, an electric carving knife will work. An electric cutter is very useful when cutting thick pieces of foam, but you can also use a long blade or bread knife as a last resort. Sometimes the store you purchased the foam from is able to cut it for you. If you cut it yourself, be sure to protect the surface you’re working on – and yourself!
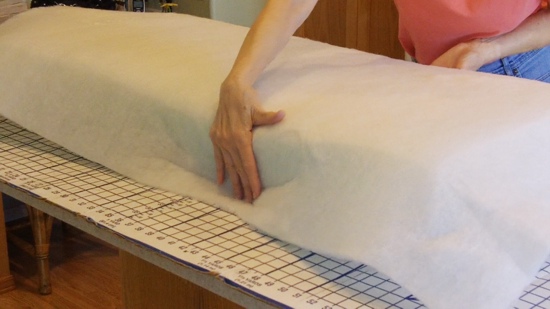
Layer the batting and foam, using the originals as a reference. To sum up the example here, we’ve got a layer of batting on the bottom (because there were gaps in the wood under the foam block – perhaps not a common occurence), then the foam, then a layer of batting is glued on using a foam glue product like FoamFast, and finally a layer of batting is wrapped around the entire block and stapled to the base on the underside:
View the Video: