 I created this pattern so that I’d have a basic fitted womens sock pattern to knit and share with all of you. The top of the sock is ribbed to ensure a better fit and the heel is well shaped to contour the foot.
Items Needed To Knit Ladies Socks:
- Size 2 DPNs
- Size 3 DPNs
- Stitch Markers
- Stitch Holder
- 2 skeins Sock Yarn (approx 200 yds each)
Gauge: 1″ = 7 sts and 8 rows in St st
What Yarns Should I Use For My Sock?
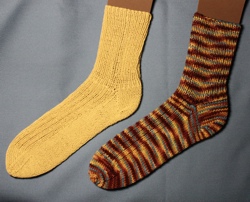
For the socks pictured here, I used two different sock yarns. The multi-colored sock on the right is made with Fiesta Baby Boom sock yarn. It’s a 100% Superwash Merino Yarn. It’s a little pricey, but very soft and machine washable.
The solid colored sock on the left is Crystal Palace Maizy, which is 82% Corn Fiber and 18% Elastic Nylon. This sock and its mate were made for someone who is allergic to wool. It’s very soft and I highly recommend it for anyone with a wool allergy!
Of course any sock yarn will work for this pattern, but for those who are new to knitting socks, just know there are many fiber options out there for you.
Begin by Knitting The Cuff
- With size 2 DPNs, co 50 sts
- k in rib knit (k1, p1)for 58 rows (about 6″) or the desired cuff length.
Note: a size 10 US sock with a 6″ cuff left me with a decent amount of leftover yarn. Maybe not enough to knit an entire second sock, so you’ll still need 2 skeins, but if you want a longer cuff by a few extra inches, you should still have enough yarn with your two 200 yd skeins to accomplish that.
 Cheryl writes: “I am a beginner at knitting. Do I use just one of the DPN’s and knit it flat, or do I divide onto 3 or 4 of the DPN’s, and if so, how many stitches on each needle?”
Answer: The sock pattern is knitted in the round on the double pointed needles, so you would divide it among three or 4 needles and knit in the round. In this case, it isn’t important how they’re split up as long as you keep with the rib knit pattern. The main thing is just put enough on each needle so that the stitches don’t slip off one end.
Begin Knitting The Heel
- Switch to Size 3 DPNs
- Put the next 26 sts onto a stitch holder.
- K the remaining 24 sts for 14 rows back and forth, ending with a purled row.
Decrease The Heel
- RS: k 16 sts, skp, turn
- (WS: sl1, p8, skp, turn
- RS: sl 1, k, sl1, k1, psso, turn)*
*Repeat items in parenthesis until you have 10 heel sts left You should be ending with a purled row.
Shaping The Heel Gusset
- k the heel sts
- On a new needle, pick up 12 sts along the side if the heel you just knitted, spread them evenly out. This is Needle 1
- Return the 26 sts from the stitch holder to a new needle and continue to knit across these. These are the instep (non heel) sts – This is Needle 2
- Pick up 12 more stitches on the other side of the heel, place marker, and knit the remaining heel sts. This is Needle 3
At this point, you should have:
- Needle 1: 12 picked up sts
- Needle 2: 26 instep stitches
- Needle 3: 12 picked up sts, a stitch marker, PLUS the 10 heel sts
I devised it this way so that if you have to put your work down suddenly, you’ll know that Needle 3 will always be the needle with the stitch marker on it. It also will help you count decreases.
Decrease Rounds
- N1: k to last 3 sts, k2tog, k1
- N2 (k2, p1)* Repeat to end of this needle
- N3: k1, sl1, k1, psso, k to end of needle
Knit Round
- N1: knit even
- N2: (k2, p1)* Repeat to end of this needle
- N3: knit even
Continue alternating Decrease Rounds and Knit Rounds until you are back to 50 sts.
Knitting The Sock Foot
Once you are back to 50 stitches, continue knitting in the round until the sock is 2 inches shorter than the desired length:
- N1: knit even
- N2: (k2, p1)* Repeat to end of this needle
- N3: knit even
Note: Because this pattern is adjustable in length for the person the sock is intended for, I recommend placing a removable marker or using a stitch counter starting on the row you begin knitting the foot of the sock so you can keep track of how many rows you knit before beginning the toe area. That way you will know exactly how many rows to knit for the matching sock.
Knit The Sock Toe
You should have 24 stitches between Needle 1 and Needle 3. Split them evenly between the two so N1 has 12 sts and 12 on N3. Do not move any sts on or off of N2.
The toe will be knitted in St st.
- N1: k to last 3 sts, k2tog, k1
- N2 k1, skp, k to last 3 sts, k2 tog, k1
- N3: k1, sl1, k1, psso, k to end of needle
Next round: Work an even round
Next round:
- N1: knit even
- N2: k1, skp, k to last 3 sts, k2 tog, k1
- N3: knit even
Alternate decrease and even rounds until there are 4 sts left on N1 and 4 sts on N3.
Finishing Your Sock
- I recommend finishing your sock off with a kitchener stitch. However, you can also thread your yarn tail through the remaining sts and pull the tail through the beginning loop tightly to secure.
- Weave in Loose Ends
- Block your sock if needed. We have a free sock blocker pattern and instructions here.
Knitting Abbreviations Used In This Pattern
- DPN – Double Pointed Needles
k – knit
k2tog – knit two together
p – purl
N – Needle
skp – slip, knit, pass slipped stitch over knitted stitch
St st – Stockinette Stitch
sts – Stitches
For more abbreviations, visit our Knitting Abbreviations Page!


