 This tutorial shows how you can add a zipper to the McCalls 4745 (Civil war uniform pants) and Suitability’s #2056 Flared Breech or Jodhpur Pattern or a similarly styled pair of pants. It does not cover invisible zippers.
The McCalls pattern originally calls for a button fly. If you are making the pants for historical accuracy purposes, you should probably stick to the pattern. However, I was using the pattern for a movie project in which the button fly would never even be noticed. A zipper was chosen for the actors’ benefit and to complete the pants in a more timely fashion. If you are making the McCalls Civil War outfit and do not want to have a button fly on the pants, or if you simply want to know how to put a zipper in any pair of pants, this tutorial can help you out!
The pants in this video are specifically the Suitability #2056 Flared Breech or Jodhpur Pattern, but I also used this method to put the zipper in the mens pants as well. The trousers in this tutorial are made of a heavy twill. A similarly weighted fabric includes denim; therefore, if you are making jeans or basic trousers, this tutorial can also be a beneficial resource for you. When completed, I’ll have the right side of the pants overlapping the left, but you can reverse that and have the left overlap the right – the choice is yours.
There is also a video demonstrating each step of this article in Part 2.
Prep The Pants Before Attaching A Zipper
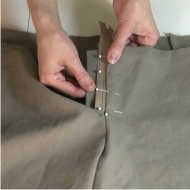
We begin by having the pants front sewn together at the crotch seam. I marked a 3/8″ line on the left side where the zipper will be attached. Pin the fabric under at the line and baste it. You will later be removing these stitches.
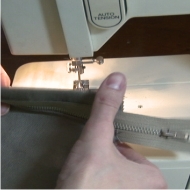
Attach the Zipper
Pin the zipper to the left fly, with the fold of the fabric just touching the left side of the center part of the zipper. You can look at a pair of jeans as a reference if you need to. Now, for the women out there, note that there are some womens’ trousers that open the opposite way, but this is becoming less common. It ultimately up to you, but I recommend looking at your favorite pants closures and determining which way you want them to open up.
Cut out the zipper placket, (a downloadable pattern for this is located here). It is a rectangular piece of fabric folded in half, to baste behind the left side of the zipper.
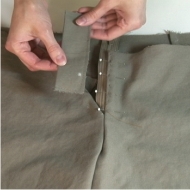
You can trim this placket to fit your pattern, if needed. Baste the placket behind the zipper on the left side of the pants.
After you baste through the left side of the pants, the zipper and the placket, you can remove the pins. Using a zipper foot on your sewing machine, sew through all the layers about 1/8″ from the edge of the left pants, near the zipper.
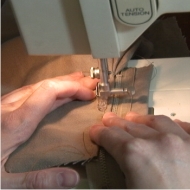
Putting the regular sewing foot back on the machine, turn the pants over and add an additional stitch to just the zipper and placket, not stitching the pants front to it. This will help reinforce the zipper. (Reminder: there is a video demonstrating this process in Part 2.)